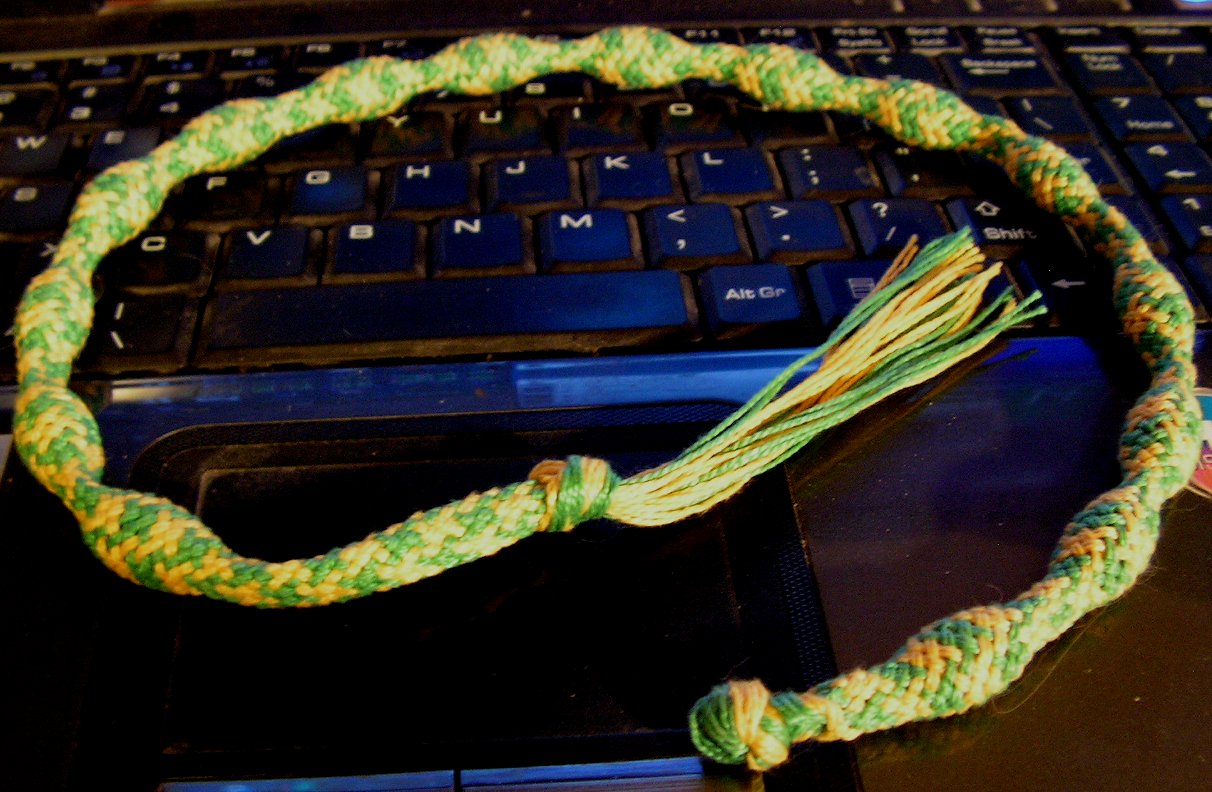
Finally! I have enough fasteners to finally show the finished project.
Umamah bint Zayd al-Andalusiyyah
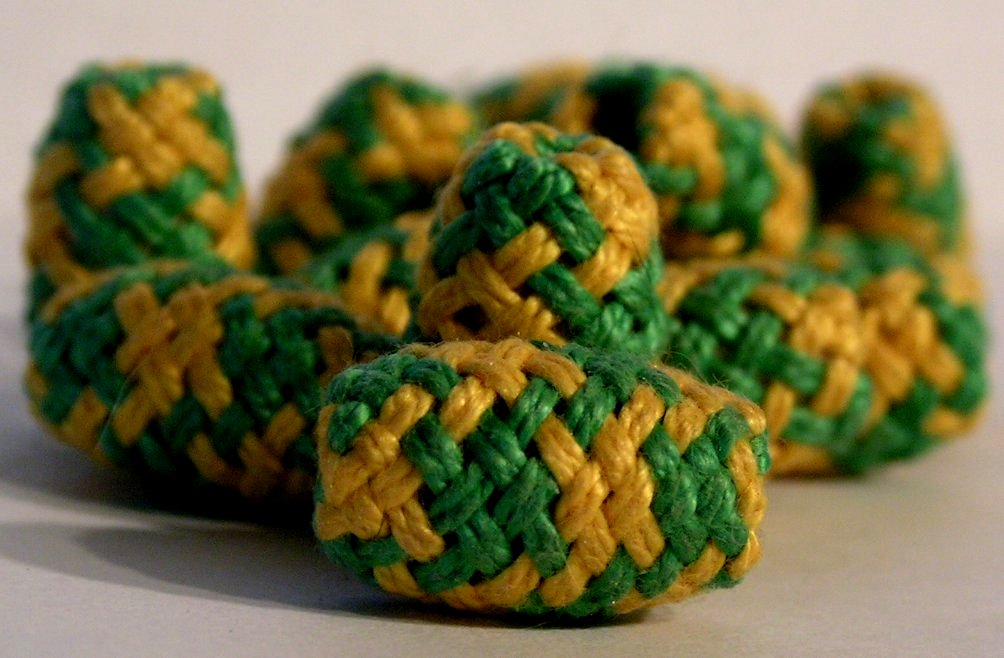
Turkish Braided Buttons
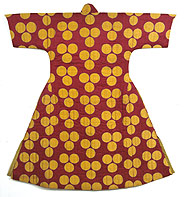
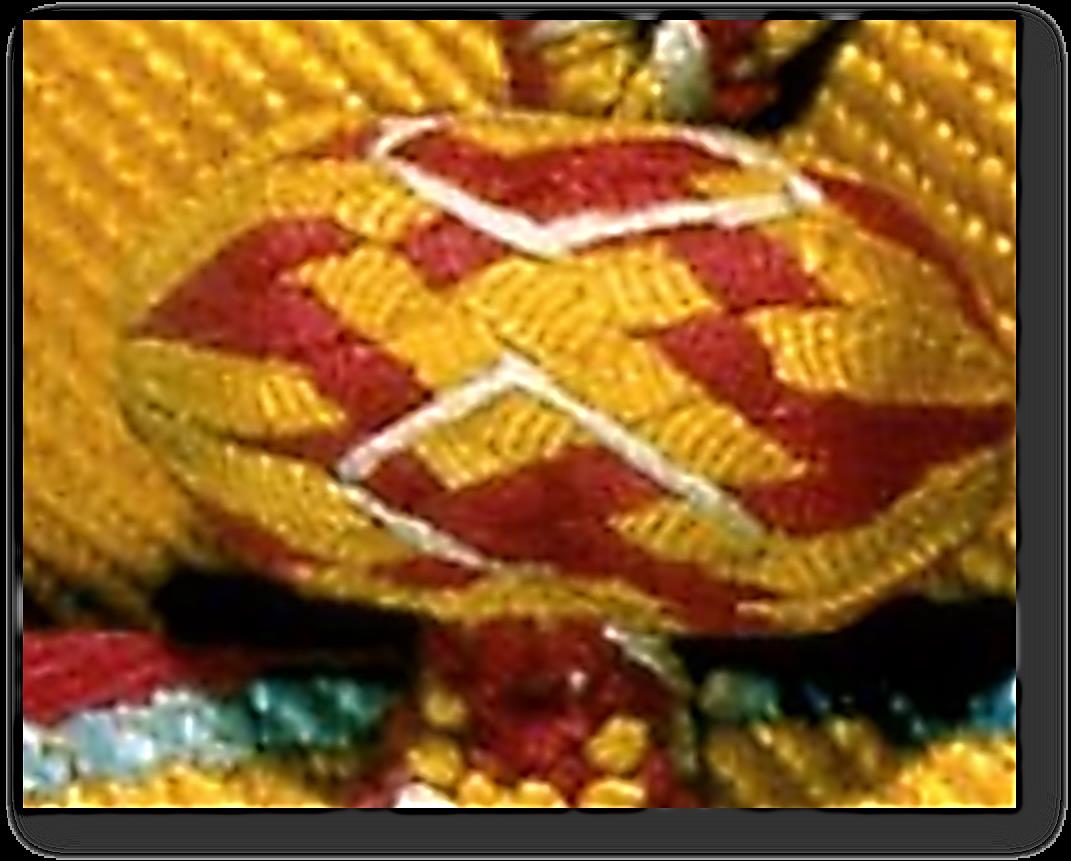
In 2006, The Smithsonian hosted Style and Status, an exhibit of Ottoman Empire coats from the Topkapi Palace Museum in Istanbul, Turkey. Unfortunately I was not able to go in person. A few of the Turkish coats are on the website (www.asia.si.edu/exhibitions/online/styleAndStatus/ ) with the ability to zoom in for the details. The red with yellow tri dot design (Figure 1) caught my eye. When I zoomed in onto the fasteners, I got excited as they appeared to be braided. I knew if I studied and experimented with the braiding methods I already knew how to do, I could reproduce them for my own garb attempts.
BIBLIOGRAPHY
Grainger, Stuart E. “Creative Ropecraft.” Sheridan House, New York 1975. ISBN 1-57409-115-8
Kinoshita, Masako; editor. L-M BRIC Newsletters L-M Braiding Research & Information Center, NY (March 1998. Revised 2001) http://www.l-mbric.net
Martin, Cathrine. “Kumihimo: Japanese Silk Braiding Techniques.” Lark Books, USA 1986. ISBN 1-937274-59-3
Speiser, Noémi. “The Manual of Braiding.” Published by the author, 1983.
Tada, Makiko. “Comprehensive Treatise VI: Kumihimo Disk and Plate.” Texte, Inc., Japan 2007 ISBN 978-4-926252-16-4
Figure 13 decorative stitching
Insert the other six threads to their midpoint where the decorative stitches are at on the button. These six threads and the two decorative threads make for a total of a fourteen strand flat braid. Now go back to the flat section and braid the flat section.
When I attempt this again I will do the braids using finger looping method. I also want to figure out how to get the chevron pointed in the correct direction. This is a long process with one person. I am hoping the finger loop method will speed up this process.
Figure 12 the greedy snake of buttons before being cut apart.
Once braiding the buttons is completed double tie off between each one and stuff the ends into the beads and glue the opening shut with tacky glue or E6000. Use a tooth pick or large needle to stuff the strands into the ends.
The next step is the decorative stitch on the button. This decorative stitch is the third color for the braid so on initial set up this thread will be longer to account for the take up of stitching the design on the button. The design is a three diamond outline. At the start point, run the thread under the button covering until the midpoint of the thread is reached then pull it thru so the midpoint is offset so you have enough thread to stitch and enough to complete the flat section. The original had diamond shapes so I went with the same motif. I stitched the right half of the diamonds all the way around and then back around for the left half, ending at the start point. The two ends of this thread for the decorative stitching become two of the fourteen strands for the flat section on the button side.
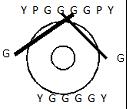
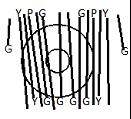
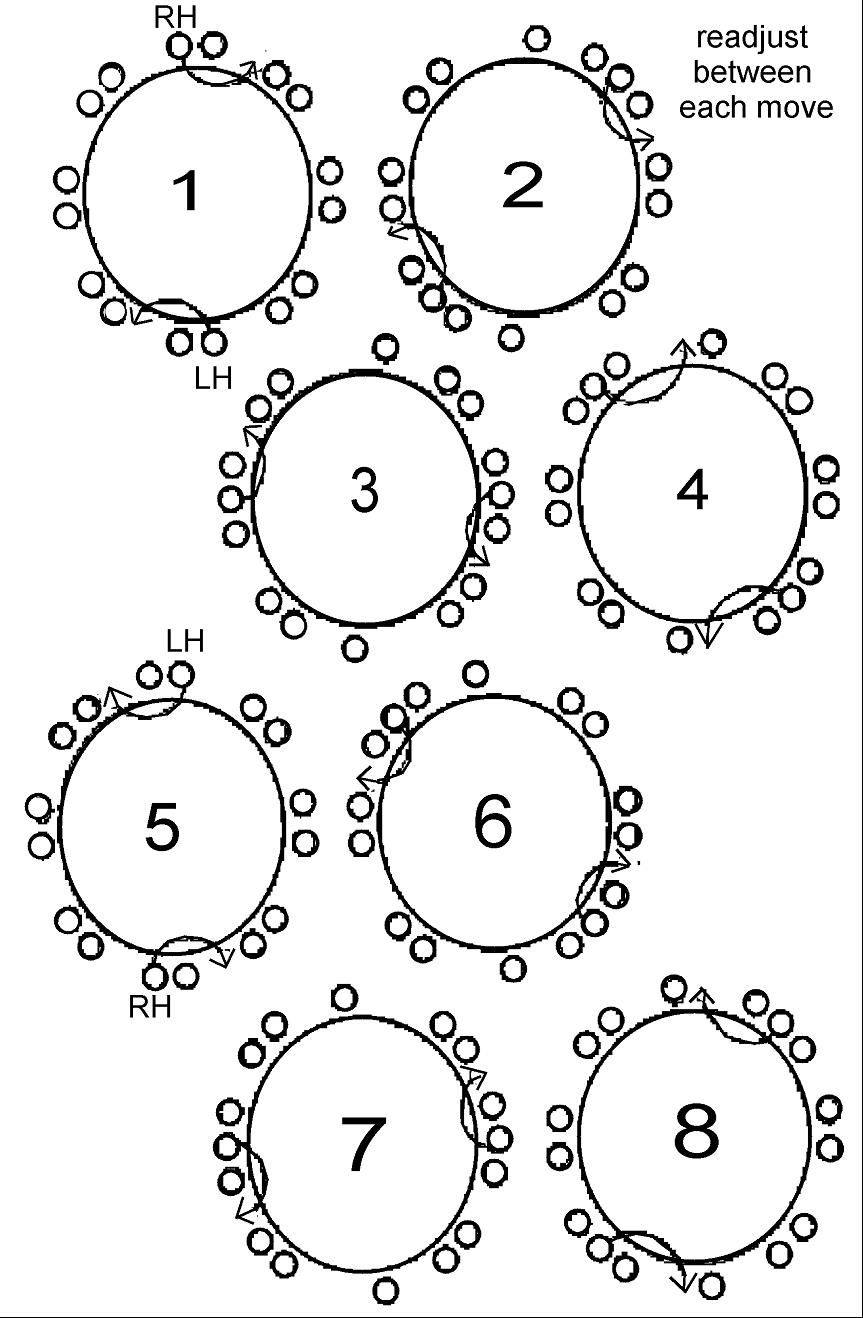
Figure 11 braiding pattern
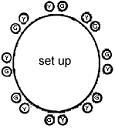
Figure 8, 9, and 10 set up of braid and view from top of the marudai
The trick with getting the bead to be covered is to start the braid and have enough thread on each end of the bead and to maintain light pressure on the bead to keep it from popping out. As you progress and have covered over half of the bead surface the bead will not jump out of the inside of the braid.
Kara-uchi (Hollow Braid) for the Button
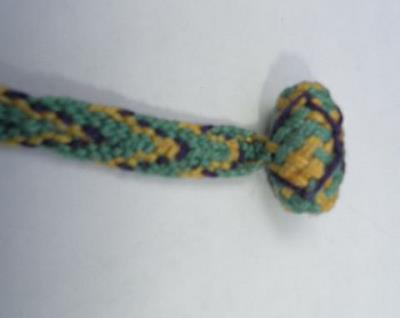
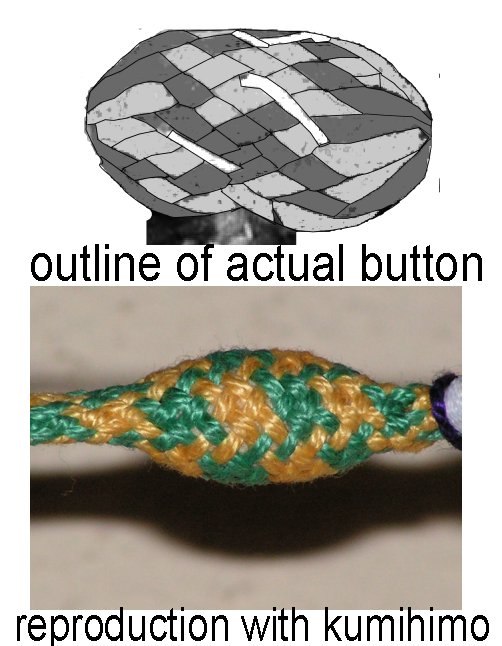
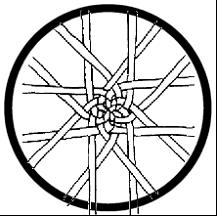
Close Up of Button(Figure 6 Left)
The buttons have some form of inner core covered by a grosgrain type material with the thread ends tucked into the ends of the button (Figure 8). The braiding patterns is a type of turk’s head knot called a pineapple knot. This pattern is also called hound’s-tooth in weaving terms. After attempting the buttons without a “second” person, I went to using a marudai to help hold the threads in position while working on covering the core. In period my assumption is that one person would braid and the second person would maintain pressure on the core material so it does not pop out of the braid. The flat section for the button seems to be attached to the button after the accent color is stitched around the button surface. The decorative thread makes up two of the threads of the flat braid and helps serve to anchor the button onto the flat section with the thread becoming part of the flat braided segment.
The button was the most complicated and frustrating part of the entire fastener. I attempted to cover the button by hand knotting but I needed to be an octopus. Not knowing what type of material the core is made up of, I used oval wood beads. The bead hole needed to be enlarged to accommodate stuffing the end threads inside. On the marudai the braid pattern is the sixteen strand hollow braid called Kara-uchi. To cover the surface of the wood bead I needed to double the threads so the braid was two threads per strand (Figure 7 Right).
THE BUTTON
Move 2 thru 7 is the bottom and the top thread switching positions from the center outwards.
Move 8 the end cords move up to the outside.
Move 1 Top 2 center cross and end up at the ends, keep the cross consistent (left over right OR right over left)
Y G G G G Y
Set up 8-Green 4-Yellow 2-Purple
Y P G G G G P Y
5.Fold the braid in half putting the loose strands together and setting them up to braid the flat section.
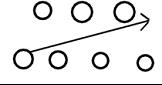
4.Movement 3 Movement 4
G G G G
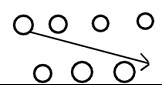
1.Find the center of the cords. This becomes the top of the loop seven strands on the left and seven strands on the right.
2.Braid the first side of the loop
3.Then go back to the beginning of the loop and set up for the second half
Set up for second half
Y Y P
Movement 1 Movement 2
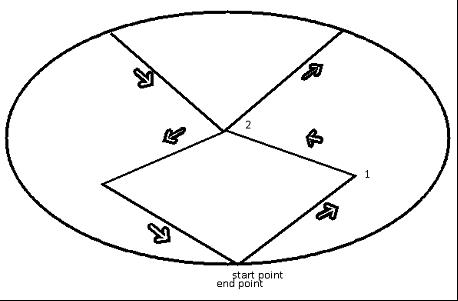
The loops are a seven strand braid called flat oblique interlacing with two ridges which uses half of threads used in the flat section of the braid. I braid from the midpoint of the strands and then I reset the disk to the where I started the first half and do the other side then combine the strands to continue braiding the flat section.
4 green, 2 yellow and 1 purple
Set up for first half
G G G G
P Y Y
THE LOOP
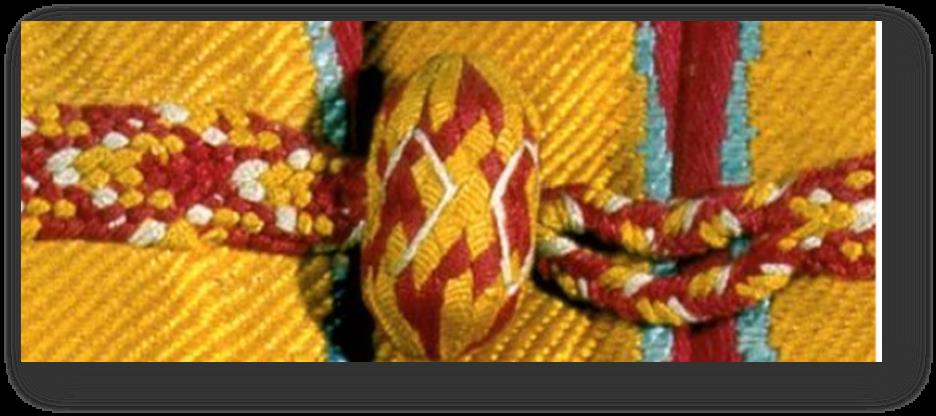
Figure 3
From studying the close up of the fasteners there are three segments: the button, the loop and the flat sections. All of the parts appeared to be braided. After figuring out the pattern and the color way for these specific coat fasteners, I concluded that at least two people worked on making the fasteners by using the finger loop method of braiding. The number of strands in the fastener would have been cumbersome for one person to manipulate, but with two people working together the braids would have been quick. To make sure the loops fit the buttons and the right number of thread ends so that the flat sections were done correctly, the button was done first then the loop section and finally the flat segments for each side.
In period, this number of strand braiding was most likely done by finger loop manipulation with two people. To support my thought on this is the color placement of the loops. At the tip of the loop as you look at the white thread in the braid, the upper loop the color is yellow-yellow-white. The lower loop the color placement is also yellow-yellow-white.
RECONSTRUCTION
The close up shows the structure which appears to be braided (Figure 3). Unfortunately, the exhibit focused on the garment as a whole and there is no information on how the fasteners were made or what materials they are made from. Since the caftan is made from silk the probability that the buttons were also made out of silk as well. Figure 3 Close up of button and loop fasteners.
Silk in this time period is considered a luxury item or a commodity. In the Ottoman Empire, silk and items made from silk were used as rewards and to confer rank and status to loyal subjects. For those visiting the empire, silk was used as a diplomatic gift and to show off the Ottoman’s wealth and power.
For my reconstruction the future owner of the coat picked a muted purple paisley upholstery fabric with a bright green linen lining. The fasteners are made from 8/2 perle cotton in purple, green and yellow. All of the materials are machine washable instead of needing to be hand washed or dry cleaned.
Figure 2 Dick Osseman
Figure 1 from Style and Status
The coat is Number 13/41. It is a 17th century brocaded lampas weave silk. The lining is satin and the collar was originally lined with fur. The original colors used for the fasteners of the coat were magenta, yellow and white. The shell of the coat was woven with red, yellow, and it appears to be a blue or teal color. The fasteners are button and loop construction (Figure 2). This is a different caftan made from a similar patterned fabric from the Topkapi Museum. This does show how the fasteners are placed.
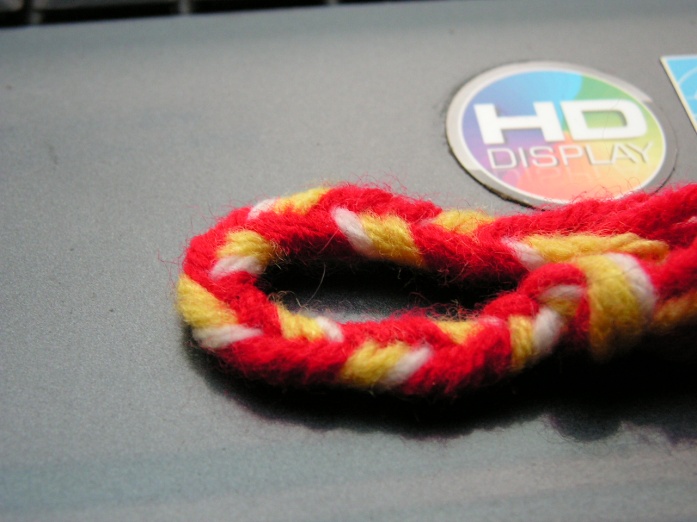
Figure 4
Figure 4 was my first attempt at making the loop as a person braiding alone. From the midpoint of the threads I braided enough of the pattern to fold the braid in half and put the loose ends together to start the flat segment. Looking at where the white thread hits on the upper part of the loop verses the lower half of the loop, the color placement of the upper half is white-yellow-yellow, and the lower half is yellow-yellow-white. This is not the same color placement as in the previous figure which supports two people braiding together or one person braiding one side of the loop then resetting to braid the second half.
Since I do most of my projects alone, I used several stands used for kumihimo, which translates to Japanese braiding, for my “second person”. Now that the color placement for the loop has been figured out, the flat section fell into place. The button part was the last part and for me the longest part to figure out.
The flat section was the easiest segment for me to figure out since I had seen a similar pattern using different number of threads in kumhimo braids. The braid structure is called Une-gumi which translates to ribbed or ridged braid. This braid is a fourteen strand braid with the loop section being seven strands. It only took me two attempts to get color placement correct. Unfortunately after finishing all the button halves, the pattern was reversed. In Figure 3 you will see that the chevron or “V” shape the point is away from the center pointing outwards. In my reconstruction the point of the chevron is pointed inward at the button and the loop (Figure 5).
Figure 5 One of the first set of buttons (note direction of chevron)